Sunday, November 9, 2014

Power at Peace


"Power at Peace"
9x12" on black Scratchbord™
From my own reference photo taken at the Toledo Zoo this past summer.

This artwork won an Honorable Mention award in drawing at the Bedford Arts for Our Future show, Bedford, Michigan.


The photo session that day had a memorable moment. I was standing inside the 3 sided glass viewing area with my back against the glass as I waited, camera up, for one of the tigers to walk towards me as he paced his enclosure. I heard a thump behind me and when I turned around a minute or so later there was a muddy foot print smeared down the glass beginning right where the back of my head was. One of the other tigers had hoped for lunch - me!

Monday, October 13, 2014

Double Dogs

Lucy and Strider finished. Both 5x7" on black Ampersand scratchboard colored in a few places with FW Acrylic inks. These are not sprayed yet, which will enrich the blacks and even out the colors.

Wednesday, September 10, 2014

Animal Commissions

I'm working towards being more prepared to do some pet portraits; mostly dogs and cats for now. I have 2 of my own in the works as samples and am hoping to get out to a dog show with a table in a few weeks. I'm still waiting on word from them about that. In the meantime I have these a bunch of these ordered as 4x6 prints from Snapfish at 1penny per print. Not a bad deal! Cheaper than business cards by far.


The two I'm working on right now are both my dogs, both black on black. Lucy in the sun, and Strider the German shepherd.  Both are 5x7.  Both will have just a very little bit of color - eyes, collars, tongue, etc.

Saturday, August 16, 2014

Rainforest Again

The latest versions - this is just a snapshot with my phone camera to show the progress. They are pretty much finished - just tweeking them a bit  more and giving it a bit of time before I varnish them.
These are 5x7's and done with FW Acrylics on Claybord™ then scratched into and glazed with light washes many times. The biggest change from the last update was replacing the hummingbird with the more colorful orchids. It seemed to complete the set much better with the brighter colors and helped balance that brilliant yellow in the toucan.

Wednesday, August 6, 2014

Amazon Rainforest Update

The latest versions of each.
Again, the toucan and macaw are finished. The jaguar, mother and child, and marmoset are much closer to finished. The hummingbird is only about 1/4th finished. But they're coming along.
See this post: Amazon Images for the beginnings of this set.

Wednesday, July 30, 2014

Tiger: Power and Peace

This fellow is from one of my zoo photos this spring. I really love the pose and the way his head is resting on his paw. It is a 9x12" scratchboard on black Ampersand board. My largest one so far. It went along very well for a bigger board and I really enjoyed doing it.
Right now I'm working in color on the Amazon set, but I'm looking forward to doing more black and white. I can't even imagine adding color to this one.

Tuesday, July 29, 2014

Amazon Images

I'm working away on this set of images from S. America's Amazon region. They are all images from sites like Paint My Photo and wetcanvas except for the mother and child which was taken in the Amazon by my mom and dad. They are 5x7" and done with FW acrylic inks on white Claybord™. The Macaw is finished, the toucan is amost finished. I just started the scratching on the jaguar yesterday. Lots to go!

I also did the parrot in a more traditional scratchboard manner on black board just to see how it looked both ways. 

Sunday, June 22, 2014

A Grey and Grizzly Day


A Grey and Grizzly Day
by Sandra LaFaut © 2014
9x12" on white Claybord
colored with Ampersand inks


My husband and I watched this bear amble along the beach at Yellowstone Lake a few years ago. We were up on a small bluff about 15 feet above the beach. The bear was not paying any attention to us until some crazy lady next to me yelled "Hey Bear!" very loudly. He looked up and I snapped the photo - then I took off for the car. Good thing he didn't follow - I didn't have the keys. But I got a nice photo.

Thursday, June 5, 2014

Keeping Watch Over Sparrows #1: Finished


The subject matter for this is from my own photos manipulated in Photoshop to get a digital image to work from. The sparrows are regulars at my feeder and from a big series of photos I took over a few winter days of strong backlighting. The eye is my own from a selfie I took last year for another project.

My heart has always been in art that portrays spiritual subjects based on Christian themes. This one is based on the theme of God's care for us in Luke 12: 6-7 "Are not five sparrows sold for two pennies? Yet not one of them is forgotten by God. Indeed the very hairs of your head are all numbered. Don't be afraid; you are worth more than many sparrows."

I see 3 levels of meaning in this as I worked on it:

  1. It is God's eye:  God watching over sparrows, and yet the eye is not focused on the birds before him, but on the viewer. He watches over us: we are his precious sparrows.
  2. It is a person's eye:  God is outside the image watching the birds, but looking beyond the birds to the person who he dearly loves and cares for.
  3. It is your eye or my eye:  As we become more like Jesus in our values, we do as he does and watch over his 'sparrows'.
It's titled #1 because I may do a few more in a series.

Tuesday, June 3, 2014

WIP Watching Over Sparrows

This one is still a work in progress (WIP). It is 5x7 and on black Ampersand board. So far I have only used a #11 scalpel blade to scratch it. That seems to be my favorite tool right now. I love the very light, soft marks I can make with it.
The subject matter for this is from my own photos manipulated in Photoshop to get a digital image to work from. The sparrows are regulars at my feeder and from a big series of photos I took over a few winter days of strong backlighting. The eye is my own from a selfie I took last year for another project.
My heart has always been in art that portrays spiritual subjects based on Christian themes. This one is based on the theme of God's care for us in Luke 12: 6-7 "Are not five sparrows sold for two pennies? Yet not one of them is forgotten by God. Indeed the very hairs of your head are all numbered. Don't be afraid; you are worth more than many sparrows."
In this one the eye represents God watching over sparrows, and yet the eye is not focused on the birds before him, but on the viewer. He watches over us: we are his precious sparrows.
I have a fair bit of work to do on this still, but will be posting along the way or when I finish it with a good scan. This is just from my phone camera.
I am open to doing more with this, maybe going into a small series. This started as a study for a larger piece.


Sunday, May 25, 2014

Northern Flicker - Finished


"Northern Flicker" 2014
6x8" 
scratchboard on black Ampersand board
Done with #11 scalpel 
Reference photo from Rodney Campbell on Paint My Photo


There was a previous post about this one and the process. I used a board that had previously been scratched and scraped off. It was an interesting experiment but I won't be doing that again. Every little mark in the board became highlighted when I sprayed the finish coats on it. It's not totally horrible, but the board doesn't have the beautiful pristine black that is normally a scratchboard characteristic. 
In this image I heavily retouched it using Photoshop to get the rich blacks again. I would probably sell the image, but at a discounted price. With the retouching though I can still offer this as a print. 
So, lesson learned - don't reuse boards in this way.

Thursday, May 22, 2014

Holding Court

"Holding Court" 2014
7x5" scratchboard on black Ampersand board
Colored with Ampersand inks
From my own reference photo
Done mostly with a #11 scalpel blade and light use of a fiberglass brush to soften fur in some places.


Barely Awake


"Barely Awake" 2014
5x7" Scratchboard on black Ampersand board
From my own reference photo
Scratched mostly with #11 scalpel and #11 Exacto blades. Highlights in white with a scoop shaped scratchboard tool.

Sunday, May 18, 2014

New Website and a Show

I've finally developed a full website over on weebly. It went fairly well and I like the way it turned out.
Here is the link: Sandra LaFaut: Scratchboard

Yesterday was the awards portion of a local art show. I entered 2 pieces. Both were accepted and the bobcat won 2nd place in graphics which came with a cash award. It was also given the honorary title of 'most boring title' - "Bobcat". Guess I'll work on titles more before showing again!

Monday, May 12, 2014

Experimenting with a Northern Flicker

I guess you could call this one a personal challenge on starting with a goofy board which once had a traced portrait start, then the inked and heavily scratched start of a red-tailed hawk, then totally scraped and re-inked with a brush and now has the flicker started on it. You can see what happened with the white chalk and the fingerprints (the ink wasn't wet but still seemed to grab the prints like a magnet) and also the heavy brush texture of the ink.


I like what the brush texture is doing in the background - it's a bit treeish. And the fingerprints, which would not come off btw, are now incorporated as diffused light. So it's coming along in an interesting way. If it finishes well I'll be happy, if it doesn't I'll still have learned a few more things. I'm having fun with it. This is a 6x8" board that started its journey as a white Claybord. The reference photo is from Rodney Campbell over on Paint My Photo.

The heavy ink is a bit of a challenge to scratch in some places and some of the vertical brush marks are visible through the bird, but it doesn't bother me artistically since it is a texture over the entire board.

I probably won't do color on this.


Saturday, May 10, 2014

Mesmerized


"Mesmerized" 2014
Scratchboard
9x12" on black Ampersand board
From my own reference photo of my backyard fish
done mostly with a #11 scalpel and a #11 exacto blade

Friday, May 2, 2014

Spray Finishes

A good teaching video on spraying finishing varnish on artwork. It's by Golden but should work for any spray finish.
It seems spraying scratchboard is the bane of any artist, even with some jokingly saying to do it while taking Valium. There seem to be many opinions on which sprays are the best, but standard advice is:
spray on warm, dry days
spray in a dust free area
don't mix brands or types of spray - it can cause cloudiness and even cracking
Edited:  I just bought and used Lascaux UV Protect Semi-Matte finish and I will keep buying it for now. It sprayed well, gives just a very soft sheen to the artwork, deepened the blacks nicely, and didn't show dust much at all. It is quite expensive compared to most other brands and it really has a strong toxic smell - use a respirator!
Edited again: I finally got a great finish on one - I put the board at the 45 degree angle recommended then sprayed with 5 very light coats with about 15 minutes between each. No orange peel, no dust spots, no gloppy stuff.

Wednesday, April 30, 2014

Freckles

"Freckles"
Scratchboard on white Ampersand Claybord
colored with Ampersand inks
6x8"
From my own reference photo
Done mostly with a #11 scalpel and fiberglass brush

Freckles belongs to my granddaughter and is a Golden Retriever. She's adorable and about 4 months old now. She was about 2 1/2 months for this photo.


This still needs to be sprayed with the varnish to protect the surface and it will look a bit different then.

Bald Eagle: Finished

Bald Eagle, 5x7" on black Ampersand scratchboard. From my own reference photo of an eagle at the Toledo Zoo.

Friday, April 25, 2014

2 Works in Progress: Red Tailed Hawk, Bald Eagle


 Red Tailed Hawk, 5x7" on white Claybord


Bald Eagle, 5x7 on black Ampersand scratchboard

Scratch Bags

 I took a break one day to make some small bags to put scratchboards in. I kept just setting the finished work on a table in my studio and, while it was fun to see it out, it was also putting them at high risk for damage. I need to get some framed but haven't done it yet.
So these bags are made from grey felt and fancied up with quilting cotton I already had on hand. The ones in the top picture are all 5x7 and the ones in the bottom picture are around 10 - 12 inches. I like the grey ones to slide into a larger bag. The ones totally covered in cotton are a little more protection with the extra layer of fabric.
These are just a simple foldover bag - no hardware or buttons. The top piece folds completely over the bag giving one more layer of fabric over the scratchboard if you put it in the way the top photo shows.
I may put a few of these on Etsy. Anyone out there interested?

Sunday, April 20, 2014

Just Playing Process

 In the original photo the girls were playing with face paint for the first time. I started with the intention of adding it, but once I got into the details of the faces I liked it too much without the paint.
The paint did make it much more difficult to see the shadows and details in some areas of their faces.
For the start of it I just very loosely added Ampersand black ink with a brush, let it dry, then started scratching out details bit by bit. This was after enlarging the photo to full size and tracing it onto the Claybord. I don't try to draw images onto the boards any more. I know how to draw, but would rather spend my time doing the scratching.
In this last one I was reinking to make the cheek shadows darker and being frustrated by the blotchy texture after I had it so smooth. I almost went to buy an airbrush, but decided to give it one more try. Using the scalpel and a VERY light touch I was able to smooth the skin, keep the darks, and not buy the airbrush. I used very soft short lines and stippling.


Just Playing

"Just Playing"
9x12"
Black ink on white Ampersand Claybord
Scratched primarily with a #11 scalpel blade,
fiberglass brush used on the softer hair areas.
From my own reference photo of 2 of my granddaughters.


Tuesday, April 15, 2014

Eye Am Watching

"Eye Am Watching"
8x10"
Black Ampersand scratchboard
done with #11 scalpel and a few other tools
colored with watercolors
Reference photos from African Wildlife Reference, used with permission

My goal on this was mainly to practice eyes, with the bonus of different types of fur. I used Photoshop Elements 11 to crop the original photos and make a composition out of this. I started out with all small rectangular images like the zebra once I started the artwork found I didn't like it that way. Most of the images were added to later to blend them together more. I am happy with this one, but if I ever redo it I would use a larger board and move the animals apart a bit more to blend them together better and leave a bit more black (negative) space.

It still has to have it's spray coating, but I'm waiting for warmer weather to spray. My studio is pretty cold right now. 

Thursday, April 10, 2014

Bobcat - Finished

"Bobcat"
9x12 " 
on white Ampersand Claybord with Ampersand black ink
the reference photo for this is my own

Sunday, April 6, 2014

Chipmunk


Chipmunk
5x7 on black Ampersand scratchboard
most of the work done with a #11 scalpel
Done from my own reference photo taken out near Cody, Wyoming a couple of years ago.
I may still add color to this but I wanted to get a good scan of the black and white version first.
This was a nice change from doing people. 

Scanning and Processing Black Scratchboard

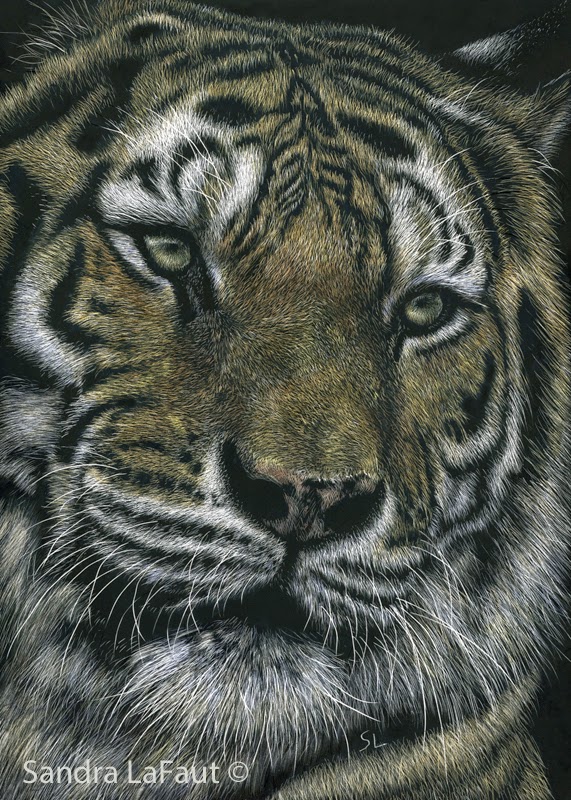
The mottling in the first and second images is from the matte varnish that is sprayed on.
Adjusting the blacks helps remove most of that and  careful dust removal using the cloning tool can take out the rest.
Getting a good scanned image can take a lot of practice and experimentation. I'm still learning, but this is what I'm doing so far especially in achieving the rich blacks of scratchboard.
When I scan I use an Epson Perfection 600 scanner which will do prints and also negatives and transparencies. I always hit the reset button to take off any scanner adjustments to sharpness, color, or levels and do those myself later using a photo editing program (Photoshop Elements 11 which came with the scanner).

When I open the raw scanned image in Photoshop I first adjust the levels with the original artwork right beside me to compare. I try to get the blacks as dark as I can without losing any of the lighter values in the image. I do the same to the white levels - get them white without losing any of the subtle grey values near them. If it is a black and white image I also strip out the colors using the desaturate feature.

Then I start going over the blacks especially doing dust removal with the cloning tool. It takes a fair amount of time to do this right. I zoom in quite a bit on the image to be sure to get it all. I get a bit obsessive in this stage to get as much as I can. At this stage I could also remove any smudges in the dark areas and also transfer lines that still may be there.

Once I have the image the way I want it I may sharpen it a bit - but not too much or the subtle areas will be lost. I also add a layer and tint it to 5-7% transparency with an olive color to bring back the warmer tones in of the scratchboard.

If I want to print the image I usually have to run a few test prints and make a few more adjustments to get the print matching the artwork - again with the original artwork right beside me.
That is my process at this time. It works pretty well for me so far. I got a lot of tips from the wetcanvas scratchboard  forum, and especially Cathy Sheeter who is one of the moderators for the forum.


Saturday, April 5, 2014

My Sister, My Friend

"My Sister, My Friend"
8x8" on Ampersand Black Scratchboard
These two little gals are very precious to my husband and I and just as sweet as they look.
And they do get along this well. They really love one another.
May it last a lifetime!

Monday, March 31, 2014

Ashleigh - new scan and tinted


I needed to rescan and touch up this - here is the latest and best version.
Ashleigh, 5x7" Black Ampersand scratchboard


Thursday, March 27, 2014

Owen No. 3

Owen #3 
5x7" on Claybord with Ampersand black ink.
This was done mostly with a #11 scalpel for the face and hair
and a Tombow abrasive eraser for the background. 
Of the three versions from the same original photo this is the one I like the best.


Wednesday, March 26, 2014

Tracing and Transfers

Not a good photo, but I wanted to show something about transferring images onto scratchboard. In this one I started tracing with a pen (the head on the left) then switched to a soft pencil once I saw what a hard line I was getting with the pen.
I've not been doing scratchboard for long, but I already know that the lighter the white transfer line the easier to get rid of it on the black board. The pen left a line that was much too strong. Easy to see and follow, but hard to cover especially in lightly scratched or black areas. So far even some of my finished sprayed works the transfer lines still show.
I also switched from Saral transfer paper to Super Chaco paper. It seems good and comes off a bit easier.
When I was using the white Claybord a few years back I drew the sketches in ink, but now I just enlarge my images on the computer, print them to size, and trace. It's so much easier and, for me, faster - plus, less mess on the black scratchboard to have to cover or work around.

Tuesday, March 18, 2014

Ashleigh

Ashleigh is the daughter of some friends of mine. As a drawing this one is just weird to work on. She has a high forehead anyways and it is  exaggerated with her head tilted down like that. She also is framed in the photograph in a halo of very light blond hair. I haven't done one like this before but it seems all that light hair will have to be added in last so I can get the skin values correct. So I feel like I'm working on a bald little gal so far.
I really wish I had an airbrush for the skin shading on the forehead though. When I add ink washes it gets splotchy and I have to work back into it a lot. I think I'm going to have to drybrush on it to get it a bit darker without having to rescratch it all.

Update:
Here it is as a finished work. See what a difference the hair makes. The color difference is just a scanning and color correction issue. I forgot to adjust the yellow to allow for the warmer tones of the Ampersand boards. The top colors are probably more accurate. This is not sprayed with a varnish yet. I'm waiting for warmer weather to spray the boards so I can open windows.

Jen Finished


Jen, 6x6"  black Ampersand board.

Owen Finished

This is 2 7x5 black Ampersand boards photoshopped together. I got so used to seeing them side by side like this I like it now. Maybe if I get the 3rd one finished it will go on here too.
The first one has a very light watercolor tint on it. Neither have been sprayed with the finish coats of fixative yet, but both have 2 light layers of Blair workable fixative on them. That is what is causing the mottling right now. I don't have enough of the Blair to finish these and other scratchboard artists have cautioned me not to mix brands or types of fixative. I guess I'll hunt a bit harder for the Blair. Too much work in these to want to ruin them.
I'm pretty happy with them even though his daddy doesn't think the likeness is good enough. I'm still learning so I'll keep practicing. I've already found a variation of the skin technique that I like better for smoother skin that involves going over the skin in every direction with very small light scratches. It gives almost an etched quality to it.


Friday, March 7, 2014

WIP: Owen


WIP: Owen, 7x5, black scratchboard from Ampersand - Stage 1
My grandson, a very sweet 2 year old. This is about 2 hours worth of work so far with a long ways to go, but I'm happy with the progress so far. I've not tried any portraiture in scratchboard and haven't done any kind of portrait in art for a long time.


Stage 2: lots of scratching into the shadows. It's too light now compared to the bright side so the next step will be to brush a diluted ink wash of the Ampersand black ink over the shadow side and work on the planes of the face. The shadow side looks too flat.
More progress to be posted here as I work.

Still working. The bottom right is the latest scratch progress. I need to work in the shadow areas more with dark ink washes. I'm also distracted by the 3 sunlit dashes in the bottom right area. I'll wash over those too. Coming along though. I want to do a couple more versions of this in the same size. One on blackboard again leaving the dark areas unscratched, and one on whiteboard.


Sunday, March 2, 2014

WIP: Buddy

Buddy, 6x6", black scraperboard, watercolors. from my own reference photo. Buddy was my favorite cat. I'm still pushing and pulling shades of grey and working on the chair. Since Buddy was grey anyways I probably won't add any more color to this that what is there in eyes and nose. 

After several years of working in other art forms, I am returning to scratchboard. I miss it. And there are so many more resources out there now on the internet for help and networking that I think I will enjoy getting into it again. 
One of my big problems right now is deciding which of my photos to work from! No matter what other kind of artwork I'm doing I always take lots of photographs. I have a large stack that I picked out as possibilities for claybord and scratchboard.